I have recently shrank the size of a Cassandra cluster from 24 m1.xlarge nodes to 6 hi1.4xlarge nodes in EC2 using Priam. The 6 nodes are significantly beefier than the nodes I started with and are handling much more work than 4 nodes combined. In this article I describe the process I went through to shrink the size of our cluster and replace the nodes with beefier ones without downtime by not swapping each node one at a time, but by creating an additional virtual region with beefier nodes and switching traffic to that.
Background:
I use Netflix’s Priam for building a multi-region Cassandra cluster on AWS. Initially my cluster consisted of 24 m1.xlarge nodes in a multi-zone and multi-region setup with the following settings:
- Hosted in 2 regions;
- Hosted in 3 zones in each region;
- Hosted 4 nodes in each zone;
- Used NetworkTopologyStrategy having a replication factor of 3 in each region;
 The above configuration makes Priam to pick the tokens such that each availability zone will have a full copy of the dataset. This means that each node is responsible for 25% of dataset. As traffic and data size significantly increased, I needed to keep up with the strict SLAs. Part of keeping the performance smooth was to eliminate all possible variables that could contribute to sporadic latency spikes. Since in this use case data models need strong consistency, I had set the read and write request to use LOCAL_QUORUM. In addition I automatically run anti-entropy repairs every other night. The performance of m1.xlarge machines started to deteriorate over time and I needed to rapidly make changes to eliminate those performance bottlenecks. As majority of Cassandra community knows, running repair is a CPU and I/O intensive task, and I sometimes observed CPU utilizations going beyond 80%. I also had over 40Gb of data per node and that is more than twice the total memory capacity, so a significant number of queries were hitting the disk resulting in inconsistent performance. I had two options to chose from:
- Double the size of the ring; costs more money;
- Use fewer but beefier machines; cost remains relatively the same;
I picked hi1.4xlarge machines because they came with SSDs as their ephemeral storage and they were also available in both regions that I was using. I loaded the full dataset to 3 nodes in one region and performed some benchmarks. I was happy with the results:
- 1ms average read latency on random read/write workload compared to 4ms before;
- 7ms average read latency for multi-get reads of 50 keys compared to 70ms;
- 95th percentile was < 200ms compared to the ones up to 700ms; (there were lots of work done here to improve the 95th percentile, I will write about it separately)
Prerequisites:
The prerequisites for this exercise is the following:
- Cassandra 1.2.1+ for the new nodes;
- Priam with my patch available on Github for the new nodes;
- Hosted on AWS EC2;
- Using Ec2Snitch or EC2MultiRegionSnitch;
- Love and Guts;
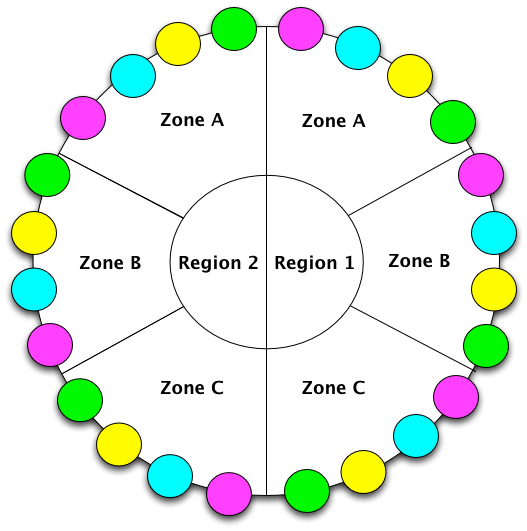
The NetworkTopology of the cluster was like the figure above. You may have a different replication factor or may not have multi-region; it does not matter.
Implementation:
 Now that I know I want to shrink the cluster to fewer machines, I can do it in two different ways:
- Replace one node at a time;
- Create another datacenter in the form of virtual region in the same AWS region and switch traffic to it;
Since Priam doesn’t have the cluster shrinking built into it, I decided to go with the second option. This provided me with a clean slate cluster acting as another datacenter (in Cassandra terminology) in the same AWS regions as I had the existing cluster. This way, I could evaluate the health of the new 3 nodes before having them serve traffic and the cleanup process of the old nodes would have been fairly simple. In this method, I utilize the patch in CASSANDRA-5155 to add a suffix to the name of the datacenter in the new cluster.
- Create a set of Priam configurations with a new name. For example, if my existing app name for Priam was cass1, I created a new set of configurations with app name cass1_ssd;
- I added two new properties to the PriamProperties domain which lets you override the region name and optionally suffix the default behavior; if you don’t specify the dc.name property, the dc.name will default to the AWS region like the original behavior; dc.suffix will get appended to the dc.name;
- If you are not using the security group Priam property, you will have to use it as you want these new nodes with the new app name to map to your existing cluster, so configure acl.groupname property to be the same security group as your existing cluster;
- Configure zones.available property and add the same suffix you are using everywhere else to the zone names; for example, us-east-1b would be us-east-1b_ssd;
- Create the configuration file /etc/cassandra-rackdc.properties with the following content on the new Cassandra nodes:
dc_suffix=_ssd - Start the new nodes; they should show up in your existing ring adjacent to the already existing data centers (AWS regions), so you will have something like us-east-1 and us-east-1_ssd as your datacenter names;
- By now you realized the nodes are seen, but because you are using NetworkTopologyStrategy, Cassandra is not sending them data for your existing keyspaces; update the existing keyspaces accordingly to have the replication send data to these new nodes; I had 3 replicas in each region, so in my case I would execute this in cassandra-cli:
use keyspace_production;
update keyspace keyspace_production with strategy_options = {us-east-1:3;us-east-1_ssd:3}; - Now that the writes are being forwarded to these new nodes, we need to make sure they claim the entire dataset from the older nodes; this can be done by running nodetool repair -pr;
- Once the repair of each node is complete, you should be able to switch your application servers to use these new nodes for read and write operations;
- I would run another round of repair on the new nodes just in case to make sure no write was missed;
- At this time you are ready to kill the old nodes. This can be done like in step 7 by removing the old datacenter from the replication strategy options;
- Kill the old nodes and go to bed;
Caveats:
You probably already know a lot of these best practices. But basically when you are doing such a massive cluster change, you need to be worry about the throughput of your disks and network. Make sure you do the following:
- Make sure you keep your Priam backups in case you screw up and had to roll back;
- Run repair on one node at a time;
- Use nodetool setstreamthroughput to change the streaming throughput to actually what your old nodes can handle without affecting your production traffic;
Conclusion:
In this article, I described how I migrated a large cluster to fewer nodes without downtimes using a patch I have added to Priam. My approach was focused around minimizing impact on the live traffic while we were doing this. You can get the updated Priam code from GitHub.